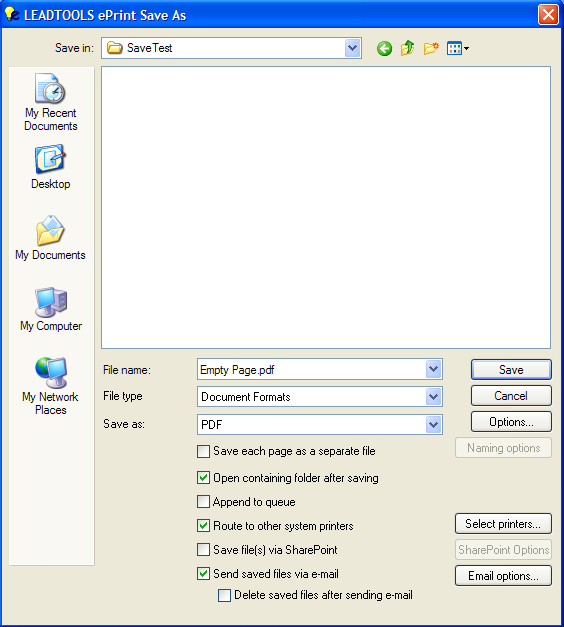
Use the SharePoint Settings dialog to configure the SharePoint settings in the classic mode Save As dialog.
To display the SharePoint Settings dialog, from the main menu, select File -> Print (or press the <Ctrl> + <P> key combination). The Print dialog will appear. In the Name drop-down list box, select LEADTOOLS ePrint 5 printer and click the OK button. The Save As Dialog (Light Edition) will appear. Make sure the Save Files Via SharePoint check box is selected, and finally, click the SharePoint Options button.

The following fields are on the SharePoint Settings dialog (light edition):
File Name Edit box
Use this edit box to enter the name of the file to be saved.
File type Drop-down list box
Use this list box to select the file type for the file (for example, Document Formats, Image Formats, Vector Formats). The selection in this list determines what appears in the Save As drop-down list box.
Save As Drop-down List box
Use the Save As drop-down list box to select one of the available formats for the file type selected in the File type Drop-down List box. If the desired format is unavailable, ensure that the appropriate file type has been selected from the File type drop-down list.
Save each page as a separate file Check box
Select this check box to save each page as a separate file. When clear, one file will be created containing all of the pages. Selecting this check button enables the Naming options button when saving a multiple page file.
Naming options Button
Click the Naming Options button to display the Naming Options dialog, which will determine the naming options to use when saving multiple files.
This button is accessible only when saving a multiple page file where each page is saved to a separate file.
Open containing folder after saving Check box
Select this check box to open the folder containing the files after the files are saved.
Append to queue Check box
Select this check box to append the files to the print queue.
Route to other system printers Check box
Select this check box to route the task to other system printers. Selecting this check box enables the Select printers button.
Select printers Button
Click this button to open the Batch Print dialog to select printers for routing.
Save file(s) via SharePoint Check box
Select this check box to save the file using SharePoint. Selecting this check box enables the SharePoint Options button.
SharePoint Options Button
Click this button to open the SharePoint Save As dialog to set SharePoint selections.
Send saved files via e-mail Check box
Select this check box to send the saved files via e-mail. Selecting this check box enables the Email Options button.
Email options Button
Click this button to open the Mail Settings dialog to set email settings.
Delete saved files after sending e-mail Check box
Select this check box to delete the saved files after sending the email.
Save Button
Click the Save button to close the dialog, save the SharePoint settings and complete the task.
Cancel Button
Click the Cancel button to close the dialog, discard any changed SharePoint settings, and close ePrint.
Options Button
Click the Options button to open the Save As Options dialog for the selected file format.
This button is only accessible for Document or Image Format files.