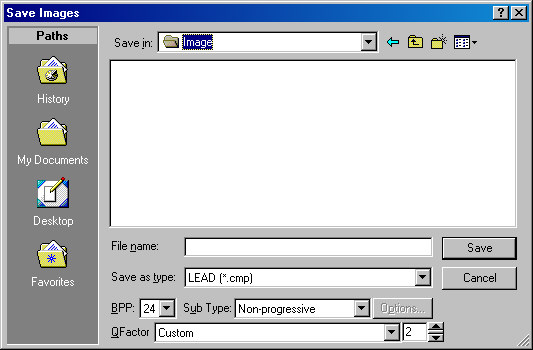
Save Images Dialog
Use the Save Images dialog to specify the save options for an Image file:

To display the Save Images dialog, click any thumbnail in the Captured Images Window, and from the Captured Images Menu, choose Save…
For more general descriptions of supported file formats in the Save Images dialog, refer to:
Summary of All Supported Image File Formats18Summary.
For more information regarding file compression and compression options, see:
Compression Using LEAD and JPEG Formats
The following are the fields in the Save Images dialog:
Save in
Use Save in dropdown list box to select the drive or folder that you want your file to stored in, when you select drive or folder from the Save in list the content of the selected drive of folder will appear in the list below.
File Name
Use File Name edit box to write name of the file you wish to save with.
Save as type
Use Save of type dropdown list box to select the file format that you wish to save your file with.
Sub Type
Use Sub Type dropdown list box to select the sub-types available for the image format selected in the "Save as type" box. This will often list alternate image compression techniques for a give type of file.
QFactor Drop-down List
Use QFactor dropdown list to select degree of loss in the compression to be used when saving files.
QFactor Edit Box
Use QFactor edit box when you select "Custom" value in the QFactor dropdown list to specify a number that determines the degree of loss in the compression process when saving to an image that uses a lossy compression technique. Valid values are 2 (highest quality) to 255 (lowest file size). This only applies to files saved as LEAD CMP or Wavelet, JPEG, JPEG2000, and TIFF with JPEG compression.
Options
Use Options button to handle more advanced options of the file you wish to save. For example, save multi-page options.
BPP
Use BPP dropdown list box to select the bits per pixel of the file you wish to save with.
Save
Use Save button to, save the file and closes the dialog box.
Cancel
Use Cancel button, to close the dialog box.
![]() Go To Last Folder Visited
Go To Last Folder Visited
Use Go To Last Folder Visited button to move to the last visited folder.
![]() Up One Level
Up One Level
Use Up One Level button to move up one folder as you navigate.
![]() New Folder
New Folder
Use New Folder button to create a new folder.
![]() View Menu
View Menu
Use View Menu button is to select the view in the list of the folders and files, the view will be Large Icons, Small Icons, List, Details, or Thumbnails. (This button is only available on Windows 2000 and later versions).